COMPATIBILITY PROBLEM FIXED FOR
FANCYGOTCHI IS NOT COMPATIBLE WITH:
ALUMINUM-ICE 1.7.8 AND LATER
JAYOFELONY 2.2.9 AND LATER
STILL WORKING ON THE WPA2-1.5.5FIX IMAGE
I fixed the compatibility problem. Fancygotchi need to be uninstalled before doing an auto-update on jayofelony/xbits image.
I'm working to write my code again to embed Fancygotchi into the Pwnagotchi Core.
A plugin will be availble to install/uninstall it, but will be available to install it natively into the new upgraded images.
I will work on a fork of the Pwnagotchi and keep this repo for the future plugin.
An other repo will be used to store all the community themes in the future.
Stay tuned and thanks for the support.
From v0R-t3X (inspired by roodriiigooo): The content here is free for use, but it doesn't mean you can use it however you want. No author or contributor assumes responsibility for the misuse of this device, project, or any component herein. The project and modifications were developed solely for educational purposes. Any files, plugins or modifications of this project or original project found here should not be sold. In the case of use in open projects, videos or any form of dissemination, please remember to give credit to the repository ♥
I'm in active development, if you want encourage me, become a Patreon or send me a voluntary contribution with Paypal
There's some previews of dev.
Pimoroni Display Hat Mini 320x240 with color background image in horizontal

Pimoroni Display Hat Mini 320x240 with color animated background in horizontal

Pimoroni Display Hat Mini 320x240 with black background in vertical

Waveshare v2 150x122 1bit color with full color web UI

This mod can be a bit slow with some features enabled on a raspberry pi zero. (I'll add a note about the best light config to your with a rpi0w soon)
the editor is not working actually, but you can see all the configuration info from the configuration toml film from the running theme.
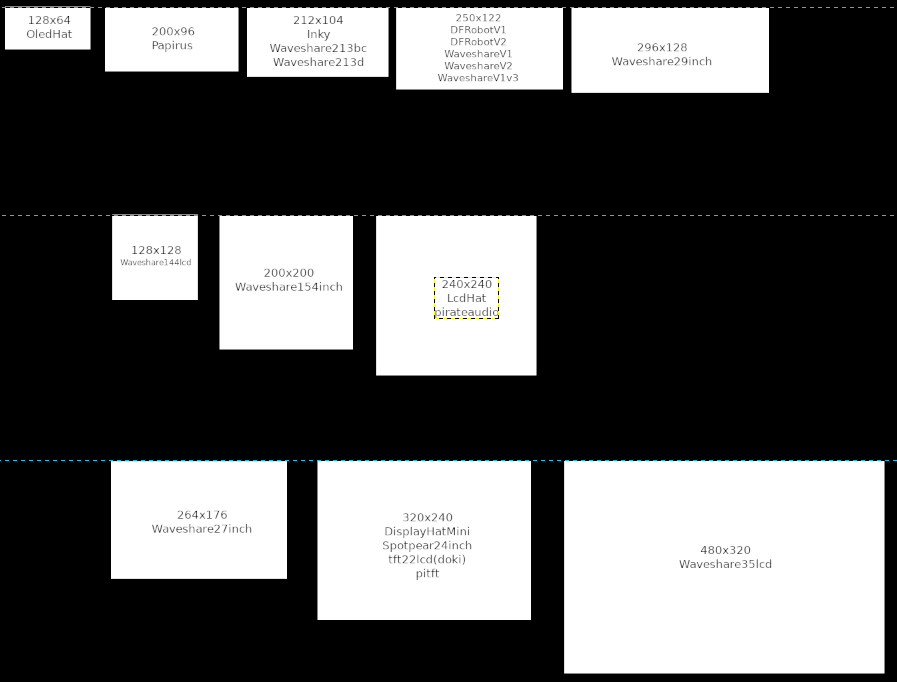
resolution comparaison of compatible display for the pwnagotchi
I SHARE IT AS BACKUP AND TO SHARE THE PROGRESS
BACKUP YOUR PWNAGOTCHI BEFORE INSTALL
A complete theme manager for the Pwnagotchi [In development]
this project started with the colorized_darkmode
v.2023.09.1
✔️ Fix for compatibility problem of aluminum-ice 1.7.8+ and xbits 2.2.9+
v.2023.08.4
✔️ Theme folder classed by resolution instead of display type (less doublon, and more futur compatibilities)
✔️ Root path fix, and should be rigth for any python version or installation path
✔️ Plugin enable/disable trigger fancy_change
✔️ Adjusting the egirl2 from LawrySauce
V.2023.08.0
✔️ Zoom feature to make icons or images bigger or smaller
✔️ Mask creation for image before conversion into 1bit
✔️ Adding the base for my Pwnachu theme version
V.2023.07.0
✔️ Added delay after deauth to avoid triggering some sort of firmware bug in nexmon. works but I don't really know why (by Sniffleupagus)
✔️ Fixing the face images mapping
-- And the begining of the web UI editor and some new them (WIP)
v.2023.05.0
✔️ Animated background (yes we can! Did in full color & 1bit)
✔️ Theme web editor
✔️switching theme on the go (yes we can!)(WIP)
✔️linking icon feature
✔️horizontal/vertical mode with rotation @Tzi sugg.
✔️ adding background color to the low color mode
✔️ adding the animated background to the low color mode
✔️ adding a foreground option
✔️ adding a function to the state.py to get and set any attribute of the state object (to change the theme OTG):
✔️ adding a function to change theme:
✔️ loop to set all new theme attributes
✔️ changing the theme name inside the config.toml to keep the change on restart/reboot
✔️ adding the partial refresh (other plugins could use it)
✔️ Force the reboot after install, to avoid a manual restart
✔️ removing creation or link of foreground image if not in use
✔️ removing creation or link of background image if not in use
✔️ removing creation of colorized background if no color set
☑️ removing color filter on text for the 1bit mode (to do this, use main_text_color for display and webUI)
✔️ stopping the OTG loop, enabled only on the web UI action
✔️ one color instead of one color for each component, avoiding a loop for every components
✔️ adding a variable to auto-install to backup a file or not (for file without original from the pwny)
✔️ paste a new file in auto-install as the @Dal restart script
✔️ adding a verification to the uninstaller to know if we need to replace a backup file or not
✔️ adding a list of color to make components flashing
✔️ adding Font Awesome as icons (need the customization of a good font for the pwny)
✔️ adding a label_line_spacing to adjust it vertical position
✔️ Backing up the RSA key, to avoid to regenerate it again if the pwny crash
✔️ Addition of the restart script from @Dal
v.2023.02.0
-review of the auto-installer, uninstaller and updater
-basic display components options are linked into a single file (one file to control them all!!)
v.2023.02.0
-remove darkmode trace
-new image genetating process added
--text in 1bit with multiple colors
--full resolution background
-lcdhat
-waveshare144.lcd
-displayhatmini
v.2022.07.3
-installer/Uninstaller
-Check update/Update
-lcdhat
-waveshare144.lcd
- Setting up your pi and the display correctly activate the web UI too
- Downloading files inside the custom plugins folder (or into the default plugins folder) on your pwnagotchi (fancygotchi.py and the fancygotchi folder)
- I keep the fancygotchi disabled when I restart the pwnagotchi
ui.display.enabled = true
ui.display.type = "displayhatmini" # use the right display for you
ui.display.color = "black"
ui.display.rotation = 0 #keep it to 0, don't use it

main.plugins.fancygotchi.enabled = false
main.plugins.fancygotchi.theme = '' # Keep empty to load the default theme.
main.plugins.fancygotchi.rotation = 0 #<--- use it
- Restart the pwnagotchi
- Goto inside the web ui plugin page
- Wait for the automatic restart.
- The pwnagotchi should restart with it new face.
1- Go inside the plugin page in the web UI
2- Check the box 'Online Update'
3- Click on Check fancygotchi update
4- This will verify the online update folder to see if this one is a new version.
5- If the new version is detected, it'll ask if you want install the update.
6- A pop-up will show up when the install is finish (or if it failed...).
7- The pwnagotchi should restart itself.
8- You need to restart the service manually one time to finish the update. (the UI should be the orginal black and white one)
After that, if all was successful, the theme should be come back and the update is supposed to be apply.
1- Create a update folder inside the fancygotchi folder.
2- Download the fancygotchi-main-20XX-XX-X.zip.
3- Unzip this zip inside the .../fancygotchi/update/ folder. (this should give this path .../fancygotchi/update/fancygotchi-main/...
4- Goinside the plugin page in the web UI.
5- Click on Check fancygotchi update
6- This will verify the local update folder to see if this one is a new version.
7- If the new version is detected, it'll ask if you want install the update.
8- A pop-up will show up when the install is finish (or if it failed...).
9- The pwnagotchi should restart itself.
10- You need to restart the service manually one time to finish the update. (the UI should be the orginal black and white one)
After that, if all was successful, the theme should be come back and the update is supposed to be apply.
You can create your own theme easily with fancygothci. You just have to copy the right display folders from the theme folder inside the fancygothci folder.
The folder three is always the same for each theme. Like the cyber theme folder.

You have the img folder for all images used inside the theme. A css file to modify the webui. And a folder with the display name. The cyber use the displayhatmini.
Inside the display folder, you will have two file config-h.toml and config-v.toml.
They stand for the Horizon and vertical configuration files. Inside it you have all the possible options. Each position, color, if it can icon or not.. etc etc etc
1- Copy the .default folder.
2- Rename it with the name of your choice, ex. yourtheme:
.../fancygotchi/themes/yourtheme
3- Inside this folder, you need a folder named with your display type (look into the config.toml file at ui.display.type). If the folder don't exist, just copy another one and rename it with the display type:
.../fancygotchi/themes/yourtheme/displayname/config-h.toml
4- Change your /etc/pwngotchi/config.toml file with your custom name: main.plugins.fancygotchi.theme = 'yourtheme'.
5- You can now modify this config-h.toml file to create your own interface.
6- After saving the config file, no need to restart the pwnagotchi, just goto the fancygotchi web plugin page, and refresh it, this will activate the OTG feature, and the UI should be refresh.
The configuration file header is composed with all the gobal options for the theme.
This start with [theme.options].
stealth_mode = false:
It's not implemented yet, but will give a way to hide the pwnagotchi UI with a foreground image and potentially custom naive components.
fg_image:
Foreground image name.
bg_color:
Background color.
bg_image:
Background image name.
bg_anim_image:
Animated background gif name.
font_sizes:
Font sizes in this order
[Bold, BoldSmall, Medium, Huge, BoldBig, Small]
font = 'DejaVuSansMono'
Font name.
status_font:
Status font name (not work properly for now).
label_spacing:
General label space.
size_offset:
Status font offset.
fps:
Refresh rate of the UI.
cursor:
Name cursor.
friend_bars:
Friend bar icons.
friend_no_bars:
Friend bar at 0.
color_web & color_display:
The color mode for the web UI or the Display.
They are independant, the web UI (and share to twitter, telegram, discord, etc) can be in full color, but the pwnagotchi can use a e-ink waveshare into 1bit color mode.
'2' = 1bit color mode B&W
'' = full color mode
anim_web & anim_display:
If an animated background is set it can be use as a fixed image too
true = animated
false = fixed on the first frame
main_text_color:
If the full color or animated full color is enabled
the main color will have priority on all text color
this option help to avoid too much lag on a raspberry pi zero w
color_text:
What will be the text color for a low color display, possible options:
'black'
'white'
'auto' = pale color will be 'white' and dark color will be 'black'
This part is for all the options native options of the pwnagotchi.
This start with [theme.main_elements].
Each Text components options can have those options:
position:
Position [x,y].
font:
Font type.
color:
The component color.
colors:
The component color table for an color animation [colorname1, colorname2, ...].
icon:
If enabled (true), the component value is treated as an image name to add to the image folder parth to use an image instead of a text.
f_awesome:
If enabled (true) and the icon feature is enabled, the component value is use to select the right font awesome character to use instead of a text.
f_awesome_size:
The font size for Font Awesome.
Each Label components options can have those options:
position:
Position [x,y].
label:
The label value.
label_font:
The label font.
text_font:
The text font.
label_spacing:
Custom label spacing for the component.
label_line_spacing:
Custom label vertical position compared to the label text.
color:
The component color.
colors:
The component color table for an color animation [colorname1, colorname2, ...].
icon:
If enabled (true), the component value is treated as an image name to add to the image folder parth to use an image instead of a text.
f_awesome:
If enabled (true) and the icon feature is enabled, the component value is use to select the right font awesome character to use instead of a text.
f_awesome_size:
The font size for Font Awesome.
zoom:
The multiplier to adjust the image size.
Number < 0 = smaller image (0.5 = half size)
Number > 0 = bigger image (2 = double size)
The third section is for all other custom plugins configuration. This start with [theme.plugin_elements].
For exemple with the bluetooth components, you can check inside the plugin file for the "add_element" variable:
https://github.com/evilsocket/pwnagotchi/blob/master/pwnagotchi/plugins/default/bt-tether.py#L586
ui.add_element('bluetooth', LabeledValue(color=BLACK, label='BT', value='-', position=(ui.width() / 2 - 15, 0),
                           label_font=fonts.Bold, text_font=fonts.Medium))
If you check into the config-h.toml you can check how the bluetooth part is constituted.
All other custom plugins are stocked under [theme.plugin_elements].
[theme.plugin_elements]

[theme.plugin_elements.bluetooth]
position = [276, 170]
label = 'BT'
value = '-'
label_font = 'Bold'
text_font = 'Medium'
label_spacing = 9
label_line_spacing = 0
color = 'lime'
colors = ['yellow','orange','red','purple','blue']
icon = false
f_awesome = false
f_awesome_size = 40
If you want you can change the pwny face too. Enable the icon feature, and places all the images faces with the right names in /themes/mytheme/img/. You can change the image type to use (I only tested it with png). The pure white on images will become transparent. Each image need to have the same size.
[theme.main_elements.face]
position = [14, 28]
font = "Huge"
color = "lime"
colors = ['yellow','orange','red','purple','blue']
icon = true # Enable here
image_type = "png"
images name in /themes/mytheme/img/:
look_r.png
look_l.png
look_r_happy.png
look_l_happy.png
sleep.png
sleep2.png
awake.png
bored.png
intense.png
cool.png
happy.png
excited.png
grateful.png
motivated.png
demotivated.png
smart.png
lonely.png
sad.png
angry.png
friend.png
broken.png
debug.png
upload.png
upload1.png
upload2.png
If something in the configration changed, no need to restart the pwnagotchi. You can go into Fancygotchi plugin page to refresh it. All the UI will be actualized.
If you create a custom theme and you want to share it. Just need to share the folder theme to another device with Fancygotchi installed.
You can fork this repo, copy your new theme and push a commit to the main. I'll add them to the main repo.